Tuesday, February 28, 2012

Pinterest Paint Party

Hey everybody!

 It has taken me FOREVER to get this post up because blogger has been so aggravating! It wouldn't hardly let me upload pictures. I read that some other people were having this problem too. I finally got it though! :)

Last Thursday night, my mom and I attended a Pinterest Paint Party! Our local Habitat for Humanity - Restore put it together and it was SO much fun! If you have a Habitat near you then you probably know that they build houses for people, so all of the money they made from the party went toward helping with houses.

With all the money they raised, they were able to paint a WHOLE house!! So wonderful!!

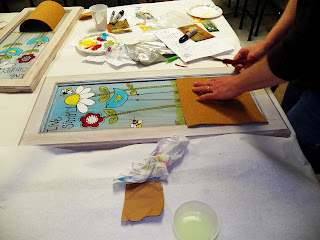
We got to paint a cabinet door and I really love how they turned out. 


We had a great teacher :) Her name is Lori and she has done a lot of paintings including some on the walls in a local mall!


Mine is on the left and my mom's is the one on the right.

We got to put a piece of cork on the bottom of ours, but you could also use chalkboard paint, magnetic paint or combine the two for a chalkboard that holds magnets. The possiblities are endless :)

We started with this ^^^

Then, we white washed it....


All you do is take regular latex paint that's white and mix it with a little bit of water and brush it on then use a paper towel to wipe it down.

It'll look similiar to this once you do that.


After that, we painted our background color. We did this in turqouise and we just mixed our paint in with the white and water mixure that we already had so that it would lighten it up.

*I didn't mix mine as good so my turquoise wasn't very light*

You then paint that on and wipe it down with a paper towel.


Next, we figured out where we wanted our images...

She had printed out, on regular printer paper, the images we would need and then she gave us some tracing paper (I don't remember exactly what it's called) and when we drew over the picture it showed up on our cabinet door. Does that make sense? lol


After that it was time to paint! :)


Then it was time to cut our cork piece to fit at the bottom

And then we were done! :)


My mom (left) and me :)

It was soo much fun and I really enjoyed the time I got to spend with my mom!

Hope you like it! :)

I'm linking this up to:


Craft Junkie Too Friend


P.S. - I got a new job! I'll be working at a daycare and I am sooo super excited! I love kids and I've always wanted to be a teacher (I'm going to school for it actually!). I have been praying and asking God to show me my path and I believe that this is his way of showing me! I feel like being around kids is what I'm suppose to do and I couldn't be happier about the path that God has chosen for me! I've applied for other jobs with no luck so I was so excited when she said that I had the job!  It couldn't have came at a better time either! I am truly blessed. I haven't started yet, I had to have my fingerprints done and get a physical and TB test. I also got a flu shot! lol I'm hoping she will let me work a few hours tomorrow because she told me she would just start me for a few hours a day til I get use to it. I'll have a room of six 18-24 month olds! It will be 5 days a week and with that and school, it won't leave much time for blogging except on weekends. I'm hoping I can make all three work :) lol I have a feeling I'm gonna be so tired, but it will be so worth it!

Pin It

Sunday, February 12, 2012

Candy Bouquet and Rhyme for Valentine's :)

Hey everybody! I hope ya'll had a wonderful weekend :)

Today I want to share with ya'll the Valentine surprise I've put together for my boyfriend. It's a candy bouquet and it has a rhyme to go along with it.You may have already seen this on Pinterest (that's where I saw it) or at pattiewack.com, and while I kept most of it the same, there are a few differences.

Here is what mine looks like :)

 
The Rhyme :

Life is a (symphony) on Valentine's Day!
And to my (sweettart) I just wanna say...
Please don't (snicker) at my silly rhyme,
And we'll celebrate with a (whopper) of a time!
I wouldn't trade you for (100 grand)
Because you're my (Lifesaver) and my best friend.
You probably think this gift is funny.
But I'll always be your (Bit O' Honey).
So let's have (mounds) of fun today,
and have a Happy Valentine's Day!

P.S. - I give you my (heart (a Reeses heart)) and
 lot's of hugs and (kisses)!!! :)

**You can also use Big Hunk in the place of sweettart, but I couldn't find the Big Hunk candy.**


I printed this out and put it on a heart in the bouquet.


I changed mine to say (Lifesavers) instead of (good n' plenty) because he doesn't like licorice. I also added the P.S. at the end.

I put Happy Valentine's Day on the flower pot with vinyl and added a silver glitter ribbon around it.


I love the way it turned out!


Wanna make your own?

Here's what I used:
A flower pot
 (size depends on the candy size you use and
extra stuff you add! As you can see, I had to have a very large one lol)
Floral Foam
Shredded Paper
Tape
Wooden Skewers 
Ribbon
Cardstock (white and red)
Cricut Expression
Gyspy
White Vinyl
Glitter
Balloon
Red hearts on a stick (found at the Dollar Tree)
Red Paint & Paint Brush
Hot Glue Gun & Glue Sticks

Candy I used:
Hershey's Symphony
Wonka Sweettarts
Snickers
Whoppers
100 grand
Lifesavers
Bit O' Honey
Mounds
Reeses Hearts
Hershey kisses

Directions:
1.) Paint your flower pot.
2.) Hot glue all the candy to the wooden skewers.
3.) Put your floral foam in your flower pot and arrange your candy (and extra stuff) the way you want.
4.) Use your gypsy and cricut to cut out the vinyl and stick it to your pot. Mine is cut from the gypsy wanderings cartridge and it's welded together. (skip this step if you don't have a gypsy or cricut.)
5.) Tie your ribbon around your pot.
6.) Cut out a heart using your cricut or however is possible for you (i have 2 layers of hearts so I used pop dots to stick them together) 
7.) Add glitter or any other decoration.
8.) Print out your poem and glue it to your heart.
9.) Glue or tape your heart to a wooden skewer. (mine is taped)

And that's all :)


Hope you liked it! Thanks for stopping by!


I'm linking this up to:


Pincushion Creations


Craft Junkie Too Friend


Thursday, February 9, 2012

"There is always, always, always something to be thankful for."

I was going to wait until tomorrow to share this, but I just CAN'T wait! lol

I just finished putting vinyl on another old window sash and I am totally in love with it! I love love love putting vinyl on windows. It's actually maybe possibly kind of addicting! :) I haven't used my cricut in over a week so I was very excited to use it again!

On my last window sash that I did I put "All you need is LOVE" on it. You can see that here.

I found a quote on Pinterest that I absolutely love and I decided it would be perfect on a window! This was originally done on a piece of wood over at My Crafty Playground!
 
 
I designed it on my gypsy and then used my cricut expression with the 12"x24" mat and cut the words as big as I could. The words in white are done in the font off of the Plantin SchoolBook cartridge and the word thankful is done from the gypsy font cartridge and I welded it together on my gypsy.

I hope you like it! :)

I'm linking this up to:
      
Craft Junkie Too FriendWeekend Bloggy Reading
sew many ways

             Pincushion Creations


Refinished End Table

Hey everybody! I hope ya'll are having a wonderful week!

Sorry I've been away for a few days! I've been super busy with school and other things and also my mom, sister and myself just made our business facebook page so that we can post all of our items were selling on there and we can keep them off our personal pages. It's called The Raspberry Room if anybody happens to be near Cullman, Alabama (or you have friends that are) and wants to go check it out  :) We are selling one of a kind dog beds, refinished furniture, vinyl products & paintings. We can also do embroidery! I'm super excited about it!

I just finished an end table which, by the way, is for sale! so I thought I would share it with ya'll! :)

Here is the before picture...


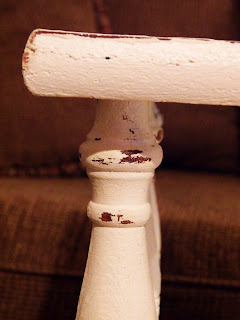
 I painted it Ivory then distressed it!


I love it so much that I wish I could keep it for myself! lol

I'm off to work on some more projects now! :)
Thanks for stopping by! :)


Wednesday, February 1, 2012

Owl Painting on an Old Window

Hey everybody!

Can you believe it's already February!?! I wish time would slow down a bit! lol

But, I have a really cute project to show ya'll today and what better way to begin a new month than with a NEW and CUTE project??

I don't know about ya'll, but I just LOVE old windows! There is so much that can be done with them. You may have seen my 'All you need is LOVE." window  that I did a while back using vinyl. It has been a big hit with everybody! 
So, today I wanna show ya'll a painting I did on a window.

I love owls so I chose to paint that.
(I've also done a bird with branches window painting that i'll show ya'll later :) My sister has made me promise to keep it for her so that she can put it in a nursery! lol)

 I love love love this one though so it's going in my room!! :)


I free handed it on some printer paper that I had put on the window and taped together so I would know how big it needed to be and then I put it behind the window and painted it.

I'm super excited to start selling these and my vinyl ones in a local shop here. They are so much fun to make. I already have 3 more windows ready to be decorated :)

I better get busy!

Thanks for stopping by!


Pin It