Thursday, January 26, 2012

Plastic Bag Holder

Ever wonder what to do with those lysol containers once you've used all the wipes?

Welllllll......

DON'T throw them away!
DO reuse them for plastic bags! :)

I hate all the loose plastic bags that just get thrown under our cabinet and fall out everytime I open it. It's probably one of my biggest pet peeves! Not anymore though :)

I found this through Pinterest and it linked back to this blog, Infarrantly Creative. You can go read the tutorial there on how to get your bags to pull out like lysol wipes would.

I made my own and added my own personal touches to the container :)

I used my cricut and cut out the words, 'Plastic Bags' in vinyl. I used the gypsy font cartridge.
Then, I hot glued some ribbon around the top and bottom of my container and added a bow!

Here it is :)


It doesn't take up as much room this way and it's cute! Plus, I don't have plastic bags flying out at me anymore. I love it and you can add whatever you want to it to make it your own :)

Thanks for visiting!


Tuesday, January 24, 2012

Candlestick Redo

 Hey ya'll! It was another beautiful day here in Cullman, Alabama!

 I decided to take advantage of that and paint some candlesticks that I got from the thrift store.
The wind didn't agree with me so much and it left a nice overspray on my arms and face, but I managed to get it done :) 


I had been eyeballing the smallest white candlestick the last two times I went in this thrift store. I knew I could paint it, but I just couldn't make myself get it. Then, I found the larger white one and I literally ran to get the other one before anybody else decided they wanted it. :)

So, I spray painted the 2 white ones with Valspar spray paint in turquoise and then I spray painted the black one with Valspar in pink!


I just love our brightly colored yard now! ;)

After they dried I sprayed some Valspar High Gloss on them to make them more glossy.  

Here's what the cans look like.
They all came from Lowe's!


And here's my finished candle sticks!


I have three apothecary jars that I think will sit perfectly on top of them :)


Thanks for stopping by my blog!
Have a great night!


Monday, January 23, 2012

Paris Themed Dog Bed


Hey everybody!

 I hope everyone stayed safe from the storms last night! Our power went off for a few hours but, other than that, we just had lots of wind, rain and lightning. It sure made for a beautiful day today though :) 70 degree weather in January is awesome! 

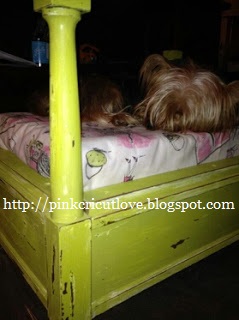
So, my mom finished the other dog bed today. This one is for her Yorkie, Lizzie Lou. 


Such a pretty girl :)

She got this end table at a thrift store for $20 and turned it into a Paris themed dog bed and you won't even believe it's the same end table now.
 Take a look :)


amazing huh!?! I LOVE it! Such a transformation. 

Here's the process...
(It's close to the same process as the other dog bed she made here.)

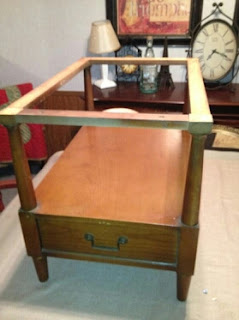
First, she took the top part off. 


and then she took the wood off that held the top on.


She decided to use those pieces as rails to hold the cushion in so she screwed them onto the bottom platform. 


(This is where the process is basically the same as the other bed) 
Next, she painted it using Valspar 'Spritz of Lime'. 


  Then she went over it using Valspar 'Sugar & Cream' and again using Valspar 'Spritz of Lime'. She sanded it to give it the distressed look. 

She bought some spindles from Lowe's to go on the posts to give it some more height and because we just felt it needed something. 

She painted them using the same colors and she also added some stain so that when she distressed it, it would look like old brown wood coming through to match the rest of the bed. 


The fabric came from Hobby Lobby and my mom liked the Paris theme of it so then we went to Lowe's for the paint and matched it to the fabric. 


I used my cricut to cut her name and the Eiffel towers in some pink and black vinyl so it could be personalized.

Her name is from the gypsy font cartridge and I welded them together and then the Eiffel towers are from the destinations cartridge.


I'm pretty sure Lizzie approves of it :)


Well, I hope you enjoyed it and I hope this project inspires you :)
 It really is a fun project and the hardest part is just 
finding the perfect end table to use! 

Thanks for stopping by! :)


Sunday, January 22, 2012

Thrift Store End Table Turned Into A Dog Bed

*This is actually a craft that my mom completed and I am just sharing! She gets full credit! :)

Hey everybody! Today I'm showing ya'll an end table that my mom bought from a thrift store and she turned it into a dog bed.

Here's the before and after picture...


First, she started with the ugly end table


She removed the doors and the piece of marble on top. Wiped it down to removed dust or anything else.


Next, she used Valspar paint and painted the whole thing. (the paint is called: day at the jewelers and it has an eggshell finish)

Don't you just love that color!?! :)

After that paint dried she went over it with Valspar sugar & cream also with an eggshell finish.
Next, you can use a bar of soap in places that you want to be sure show through when sanding it.

After that she went back over it lightly with some more of the turquoise color paint.
 
I love the legs on this table!
Next, she sanded it...


Make sure to get the edges and any high spots that will get worn out over time.

You can do as much sanding or as little as you want. It's your preference.


Wipe the sand dust off and then it's ready for the cushion to be put in :)

My sister is the sewing queen around our house so she is gonna sew our cushion together to hold the stuffing in.

And that's it! I hope you like it :)


Friday, January 20, 2012

Vinyl on an Old Window

Hey everyone! Thanks for visiting!

I am SO excited about what I'm fixing to show y'all!

 This is probably my most favorite thing I've done so far! I found this through Pinterest and just couldn't wait to do it! It originally came from Sisters With Flair blog.

I put "all you need is LOVE." in vinyl on an old window that I got for $4 at Firehouse Antiques.  I stayed up til nearly 3 in the morning working on it, but it was so worth it because I love how it turned out!


I am so in love with it! What do ya'll think??? :)

This was my first time cutting vinyl on my cricut and I only messed up once because it didn't cut through the vinyl so I had to change my pressure.

I used these settings for cutting my vinyl:
Pressure - medium
speed - low
blade - 6

That gave me the 'kiss cut' (cut through the vinyl, but not the backing) that I needed.

I used my gypsy to design it how I wanted it. It took me 2 days to finally get my cricut to cut my welded images off my gypsy. I still don't know what I was doing wrong lol.


I had to split it up since I was using 2 different colors of vinyl. 

Next, I cut out my designs.


Don't you just love that pink??

Now, I'm gonna share something totally awesome with ya'll that I found through Pinterest that linked back to this blog. First, let me just say how completely amazing her and her husband are for thinking of this! It was so easy and worked like a charm!


You can use Glad Press'n Seal as an inexpensive alternative to Transfer Tape! I didn't think it was gonna work for me at first, but I got a card and pressed it as hard as I could onto the letters and it peeled them right up just like transfer tape would! You have to work with it a bit, but it's really not hard!

Next, it was time to put it on my window.


I put the love one under the window so I could kinda tell where it all needed to go. I started from left to right and pressed the letters down while holding the others in the air so they wouldn't stick before I wanted them to. This prevented my vinyl from folding up and wrinkling. Then I did the same for 'LOVE'.


ahh I love it! I can't wait to get it hung on my wall! :)

Thanks for stopping by!