Showing posts with label Cricut. Show all posts

Saturday, January 19, 2013

Drawer turned into Dog Bed! It's a RUFF life and I'm lovin' it!

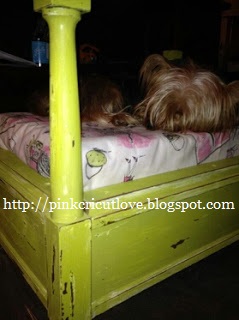
Hey y'all! Goodness, what a long time it's been since I posted something on here! I got a job and didn't have as much time for crafts, but now that I have a little more free time, I hope to starting posting more! I also have another blog with my sister that is about couponing so if any of y'all would like to learn how to coupon, check us out at Southern Coupon Junkies! I'm not sure how well I will do juggling between two blogs, but I'm willing to try! Hopefully with the help of my mom & sister, we can make it work :) I'm super excited about this dog bed that I'm going to share with y'all today. My mom and I made it out of a drawer that we got at our local Habitat for Humanity. It's super simple to make and your little furry friend is sure to love it :) I used my Cricut to cut the saying out, "It's a RUFF life...and I'm lovin' it!" I also hand painted the little doggy paw prints across the front. I think it turned out so cute, but I'll let y'all be the judge of that! Just be nice, please :)


What do y'all think!? :) You can leave me a comment on this blog post or over on our facebook page, The Raspberry Room! Also, this one is available to buy on our Facebook page, as well as some other items! Thanks for stopping by and have a great day! :)
-Kara


Sunday, February 12, 2012

Candy Bouquet and Rhyme for Valentine's :)

Hey everybody! I hope ya'll had a wonderful weekend :)

Today I want to share with ya'll the Valentine surprise I've put together for my boyfriend. It's a candy bouquet and it has a rhyme to go along with it.You may have already seen this on Pinterest (that's where I saw it) or at pattiewack.com, and while I kept most of it the same, there are a few differences.

Here is what mine looks like :)

 
The Rhyme :

Life is a (symphony) on Valentine's Day!
And to my (sweettart) I just wanna say...
Please don't (snicker) at my silly rhyme,
And we'll celebrate with a (whopper) of a time!
I wouldn't trade you for (100 grand)
Because you're my (Lifesaver) and my best friend.
You probably think this gift is funny.
But I'll always be your (Bit O' Honey).
So let's have (mounds) of fun today,
and have a Happy Valentine's Day!

P.S. - I give you my (heart (a Reeses heart)) and
 lot's of hugs and (kisses)!!! :)

**You can also use Big Hunk in the place of sweettart, but I couldn't find the Big Hunk candy.**


I printed this out and put it on a heart in the bouquet.


I changed mine to say (Lifesavers) instead of (good n' plenty) because he doesn't like licorice. I also added the P.S. at the end.

I put Happy Valentine's Day on the flower pot with vinyl and added a silver glitter ribbon around it.


I love the way it turned out!


Wanna make your own?

Here's what I used:
A flower pot
 (size depends on the candy size you use and
extra stuff you add! As you can see, I had to have a very large one lol)
Floral Foam
Shredded Paper
Tape
Wooden Skewers 
Ribbon
Cardstock (white and red)
Cricut Expression
Gyspy
White Vinyl
Glitter
Balloon
Red hearts on a stick (found at the Dollar Tree)
Red Paint & Paint Brush
Hot Glue Gun & Glue Sticks

Candy I used:
Hershey's Symphony
Wonka Sweettarts
Snickers
Whoppers
100 grand
Lifesavers
Bit O' Honey
Mounds
Reeses Hearts
Hershey kisses

Directions:
1.) Paint your flower pot.
2.) Hot glue all the candy to the wooden skewers.
3.) Put your floral foam in your flower pot and arrange your candy (and extra stuff) the way you want.
4.) Use your gypsy and cricut to cut out the vinyl and stick it to your pot. Mine is cut from the gypsy wanderings cartridge and it's welded together. (skip this step if you don't have a gypsy or cricut.)
5.) Tie your ribbon around your pot.
6.) Cut out a heart using your cricut or however is possible for you (i have 2 layers of hearts so I used pop dots to stick them together) 
7.) Add glitter or any other decoration.
8.) Print out your poem and glue it to your heart.
9.) Glue or tape your heart to a wooden skewer. (mine is taped)

And that's all :)


Hope you liked it! Thanks for stopping by!


I'm linking this up to:


Pincushion Creations


Craft Junkie Too Friend


Thursday, February 9, 2012

"There is always, always, always something to be thankful for."

I was going to wait until tomorrow to share this, but I just CAN'T wait! lol

I just finished putting vinyl on another old window sash and I am totally in love with it! I love love love putting vinyl on windows. It's actually maybe possibly kind of addicting! :) I haven't used my cricut in over a week so I was very excited to use it again!

On my last window sash that I did I put "All you need is LOVE" on it. You can see that here.

I found a quote on Pinterest that I absolutely love and I decided it would be perfect on a window! This was originally done on a piece of wood over at My Crafty Playground!
 
 
I designed it on my gypsy and then used my cricut expression with the 12"x24" mat and cut the words as big as I could. The words in white are done in the font off of the Plantin SchoolBook cartridge and the word thankful is done from the gypsy font cartridge and I welded it together on my gypsy.

I hope you like it! :)

I'm linking this up to:
      
Craft Junkie Too FriendWeekend Bloggy Reading
sew many ways

             Pincushion Creations


Thursday, January 26, 2012

Plastic Bag Holder

Ever wonder what to do with those lysol containers once you've used all the wipes?

Welllllll......

DON'T throw them away!
DO reuse them for plastic bags! :)

I hate all the loose plastic bags that just get thrown under our cabinet and fall out everytime I open it. It's probably one of my biggest pet peeves! Not anymore though :)

I found this through Pinterest and it linked back to this blog, Infarrantly Creative. You can go read the tutorial there on how to get your bags to pull out like lysol wipes would.

I made my own and added my own personal touches to the container :)

I used my cricut and cut out the words, 'Plastic Bags' in vinyl. I used the gypsy font cartridge.
Then, I hot glued some ribbon around the top and bottom of my container and added a bow!

Here it is :)


It doesn't take up as much room this way and it's cute! Plus, I don't have plastic bags flying out at me anymore. I love it and you can add whatever you want to it to make it your own :)

Thanks for visiting!


Monday, January 23, 2012

Paris Themed Dog Bed


Hey everybody!

 I hope everyone stayed safe from the storms last night! Our power went off for a few hours but, other than that, we just had lots of wind, rain and lightning. It sure made for a beautiful day today though :) 70 degree weather in January is awesome! 

So, my mom finished the other dog bed today. This one is for her Yorkie, Lizzie Lou. 


Such a pretty girl :)

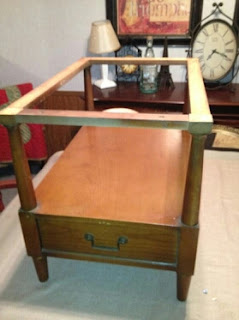
She got this end table at a thrift store for $20 and turned it into a Paris themed dog bed and you won't even believe it's the same end table now.
 Take a look :)


amazing huh!?! I LOVE it! Such a transformation. 

Here's the process...
(It's close to the same process as the other dog bed she made here.)

First, she took the top part off. 


and then she took the wood off that held the top on.


She decided to use those pieces as rails to hold the cushion in so she screwed them onto the bottom platform. 


(This is where the process is basically the same as the other bed) 
Next, she painted it using Valspar 'Spritz of Lime'. 


  Then she went over it using Valspar 'Sugar & Cream' and again using Valspar 'Spritz of Lime'. She sanded it to give it the distressed look. 

She bought some spindles from Lowe's to go on the posts to give it some more height and because we just felt it needed something. 

She painted them using the same colors and she also added some stain so that when she distressed it, it would look like old brown wood coming through to match the rest of the bed. 


The fabric came from Hobby Lobby and my mom liked the Paris theme of it so then we went to Lowe's for the paint and matched it to the fabric. 


I used my cricut to cut her name and the Eiffel towers in some pink and black vinyl so it could be personalized.

Her name is from the gypsy font cartridge and I welded them together and then the Eiffel towers are from the destinations cartridge.


I'm pretty sure Lizzie approves of it :)


Well, I hope you enjoyed it and I hope this project inspires you :)
 It really is a fun project and the hardest part is just 
finding the perfect end table to use! 

Thanks for stopping by! :)


Friday, January 20, 2012

Vinyl on an Old Window

Hey everyone! Thanks for visiting!

I am SO excited about what I'm fixing to show y'all!

 This is probably my most favorite thing I've done so far! I found this through Pinterest and just couldn't wait to do it! It originally came from Sisters With Flair blog.

I put "all you need is LOVE." in vinyl on an old window that I got for $4 at Firehouse Antiques.  I stayed up til nearly 3 in the morning working on it, but it was so worth it because I love how it turned out!


I am so in love with it! What do ya'll think??? :)

This was my first time cutting vinyl on my cricut and I only messed up once because it didn't cut through the vinyl so I had to change my pressure.

I used these settings for cutting my vinyl:
Pressure - medium
speed - low
blade - 6

That gave me the 'kiss cut' (cut through the vinyl, but not the backing) that I needed.

I used my gypsy to design it how I wanted it. It took me 2 days to finally get my cricut to cut my welded images off my gypsy. I still don't know what I was doing wrong lol.


I had to split it up since I was using 2 different colors of vinyl. 

Next, I cut out my designs.


Don't you just love that pink??

Now, I'm gonna share something totally awesome with ya'll that I found through Pinterest that linked back to this blog. First, let me just say how completely amazing her and her husband are for thinking of this! It was so easy and worked like a charm!


You can use Glad Press'n Seal as an inexpensive alternative to Transfer Tape! I didn't think it was gonna work for me at first, but I got a card and pressed it as hard as I could onto the letters and it peeled them right up just like transfer tape would! You have to work with it a bit, but it's really not hard!

Next, it was time to put it on my window.


I put the love one under the window so I could kinda tell where it all needed to go. I started from left to right and pressed the letters down while holding the others in the air so they wouldn't stick before I wanted them to. This prevented my vinyl from folding up and wrinkling. Then I did the same for 'LOVE'.


ahh I love it! I can't wait to get it hung on my wall! :)

Thanks for stopping by!